Rating: 4.6/5
Panavia V5 Review
Panavia V5 is Kuraray Noritake’s flagship adhesive resin cement, and it remains one of the most recommended luting agents for compromised preparations. This review covers the...
Reviewed by Marcus Hale
Pros
- Self-cure dentin bond strength that does not collapse when light cannot reach the interface, which is the defining advantage of the product.
- Indication coverage spanning crowns, bridges, inlays, onlays, veneers, adhesive bridges and splints, implant abutments and frameworks, posts and cores, and amalgam bonding.
- Two primer bottles cover zirconia, lithium disilicate, feldspathic porcelain, hybrid ceramics, composite, and metal, which simplifies inventory.
- Amine-free formulation avoids the marginal yellowing that undermines conventional dual-cure cements over several years.
- Film thickness of 12 microns allows complete and predictable seating.
- Radiopacity of 180 percent Al makes residual cement findable on a radiograph.
- Five shades with try-in pastes that genuinely predict the cured result.
- Fluoride release of 58 micrograms per gram over 28 days at the margin.
- Three decades of peer-reviewed literature behind the underlying MDP chemistry.
- Cleanup after tack-curing is cleaner than most competing dual-cure cements.
Cons
- The material is not self-adhesive, which means more steps and more opportunity for error than a one-bottle system.
- Technique sensitivity is high, and inadequate drying of the Tooth Primer directly degrades bond strength.
- Intraoral working time of 60 seconds constrains multi-unit sequencing and forces cementation in small batches.
- Cost per unit runs higher once paste, two primers, and etchant are consumed on every case.
- The Opaque shade cannot be light-cured and requires three minutes of maintained isolation.
- Isolation demands make it a poor fit for practices that struggle with moisture control on deep margins.
- Refrigerated storage adds a warm-up step before the first case of the day.
- Assistants need to know the sequence thoroughly, so it is not a product to introduce mid-procedure with a new team member.
- Adhesion is wasted effort on a well-retentive full-coverage crown with sound resistance form.
Panavia V5 is Kuraray Noritake’s flagship adhesive resin cement, and it remains one of the most recommended luting agents for compromised preparations. This review covers the chemistry, the published bond strength data, an eight-week in-practice evaluation, and the cases where a simpler cement does the job better.
TL;DR
Panavia V5 produces self-cure dentin bond strengths that hold up under opaque restorations, which makes it the strongest option for short, over-tapered, and otherwise retention-compromised preparations.
The system needs two separate primers and roughly four extra minutes per unit compared with a self-adhesive cement.
An eight-week in-practice evaluation across 58 units recorded no debonds, one shade complaint, and faster excess cleanup than the practice reported with its previous cement.
Most practices should stock Panavia V5 alongside a self-adhesive cement and reserve it for cases where adhesion carries structural load.
What Is Panavia V5?
Panavia V5 is a dual-cure, fluoride-releasing, radiopaque adhesive resin cement manufactured by Kuraray Noritake Dental. It sits fifth in a product line that started in 1983 with Panavia EX, the first commercial cement to carry Kuraray’s original MDP monomer.
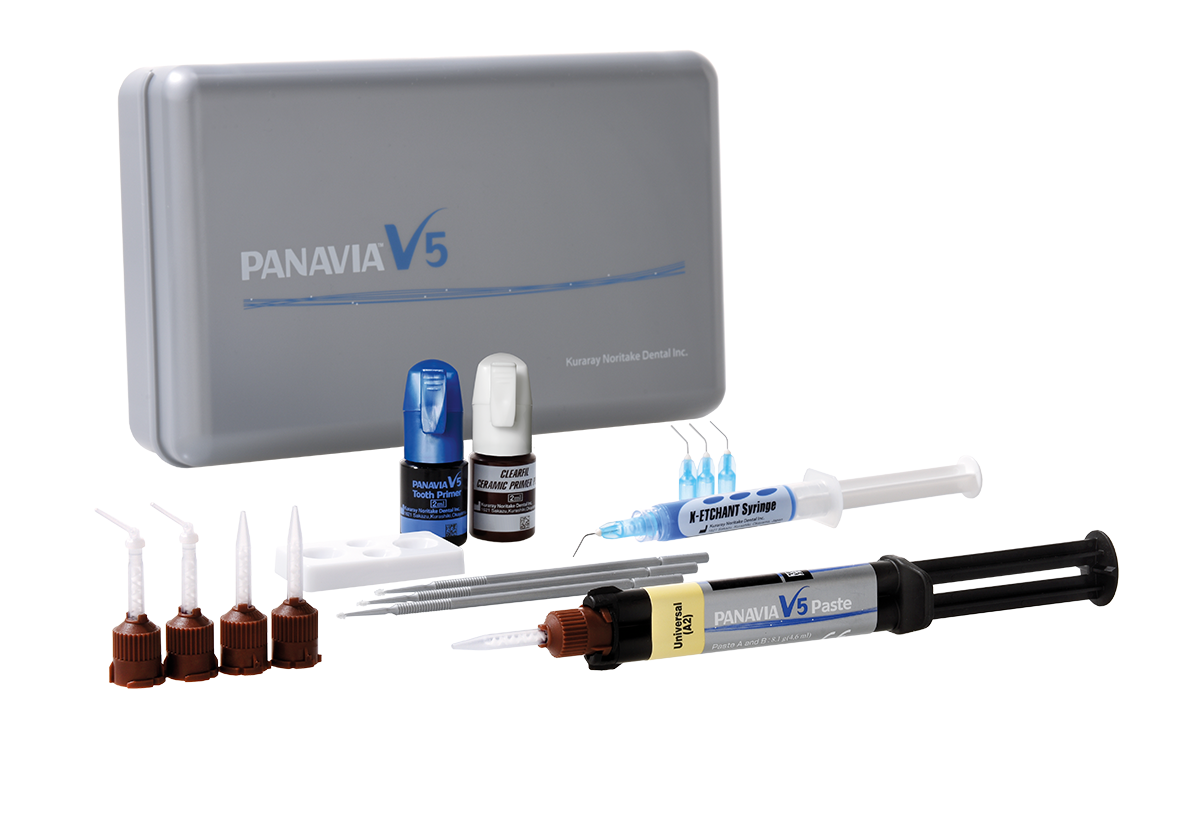
The system has four components. The automix paste does the luting work. The Panavia V5 Tooth Primer is a single-bottle self-etching primer containing MDP, HEMA, water, and a proprietary accelerator. Clearfil Ceramic Primer Plus combines a silane coupling agent with MDP in ethanol for restoration surfaces. K-Etchant Syringe is a thixotropic phosphoric acid gel containing silica, used for selective enamel etching.
One point deserves emphasis before anything else. Panavia V5 is not a self-adhesive cement. It will not bond to tooth structure without the Tooth Primer. A large share of disappointing outcomes trace back to clinicians treating it as a one-step material, and no amount of paste quality compensates for a skipped primer. Practices that want a genuinely single-step option from the same manufacturer should look at Panavia SA Cement Universal instead.
Kuraray now fields three resin cements. Panavia V5 covers the broadest indication list, Panavia SA Cement Universal handles routine retentive crowns quickly, and Panavia Veneer LC serves high-volume veneer work with a long working time. Full details on positioning are published on the manufacturer product page.
How The Panavia V5 System Works
Three chemical decisions separate this cement from a conventional dual-cure luting composite. Each one has a direct clinical consequence, so they are worth understanding rather than skimming.
The MDP Monomer
Kuraray’s 10-MDP monomer bonds chemically to hydroxyapatite, forming water-insoluble calcium salts at the dentin interface. The same molecule interacts with metal oxides, which gives it a genuine chemical bond to zirconia, titanium, and base metal alloys.
That dual capability explains why the kit needs so few bottles. Clinicians already familiar with MDP from a universal adhesive will recognize the chemistry, since the monomer underpins most modern bonding systems on the market. Practices comparing bonding agents may also find the All-Bond Universal review useful for context on how MDP-containing adhesives differ in handling.
Touch-Cure Chemistry
Most dual-cure resin cements depend heavily on light activation to reach an acceptable degree of conversion. When the restoration blocks light, a metal crown, a zirconia coping, a post space 12 mm deep, the self-cure pathway carries the load and bond strength quietly drops.
The Tooth Primer contains a catalyst that starts polymerization the moment the paste contacts the primed surface. Kuraray calls this touch-cure, and the manufacturer benchmarks the resulting self-cure dentin bond strength against Clearfil SE Bond, its light-cured reference adhesive. Translated into clinical terms, the deep and inaccessible parts of a preparation receive a real bond rather than a hopeful one. This single property is the reason clinicians reach for Panavia V5 on cases that would otherwise worry them.
The Amine-Free Paste
Conventional dual-cure cements use tertiary amines as co-initiators. Amines oxidize over time and yellow, which is why a well-matched anterior crown can look wrong at the margin three years later.
Panavia V5 uses an amine-free paste. Kuraray reports color change below a delta E of 3 across four weeks of accelerated testing, a level most observers cannot perceive. The paste also carries natural fluorescence, so margins disappear under UV-rich light instead of reading as dark lines in clinical photography.
Technical Specifications
The published figures below come from Kuraray Noritake technical data, measured in dual-cure mode and, where indicated, according to ISO 4049:2009. Full values are available on the official technical specifications page.
Property | Value |
|---|---|
Category | Adhesive dual-cure universal resin cement |
Delivery | Automix syringe, equal-part paste A and B |
Shades | Universal (A2), Clear, Brown (A4), White, Opaque |
Film thickness | 12 microns |
Flexural strength | 127 MPa |
Flexural modulus | 6.3 GPa |
Compressive strength | 310 MPa |
Water sorption | 21 micrograms per cubic millimeter |
Filler loading | 61 percent by weight, 38 percent by volume |
Radiopacity | 180 percent Al |
Fluoride release over 28 days | 58 micrograms per gram |
Working time at 23 C after dispensing | 2 minutes |
Intraoral working time at 37 C | 60 seconds from contact with Tooth Primer |
Self-cure setting time at 37 C | 3 minutes |
Light-cure time | 10 seconds per surface |
Tack-cure time | 3 to 5 seconds |
Amine-free | Yes |
Two numbers matter more than the rest in daily practice. A film thickness of 12 microns sits far inside the ISO 4049 ceiling of 50 microns, so well-fitting restorations seat completely without the resistance that thicker cements produce. Radiopacity of 180 percent Al makes residual cement conspicuous on a radiograph, which is a real safety feature around subgingival and implant margins.
What Comes In The Kit
Kuraray sells the system in two configurations, and the difference between them affects what kind of cases a practice can run on the first purchase.
Standard kit contains a 4.6 mL paste syringe, 1.8 mL try-in paste, 4 mL Tooth Primer, 4 mL Clearfil Ceramic Primer Plus, 3 mL K-Etchant syringe, 15 mixing tips, 5 endo tips, 20 needle tips, 50 applicator brushes, a mixing dish, a laminated protocol chart, and a storage case.
Introductory kit contains a 2.4 mL paste syringe, 2 mL Tooth Primer, 2 mL Clearfil Ceramic Primer Plus, 10 mixing tips, 10 endo tips, 50 applicator brushes, and a mixing dish.
The introductory kit omits both the try-in paste and the etchant, which rules out serious anterior work until those are ordered separately.
Every component is available as an individual refill, and refill economics beat repeat kit purchases once a practice already holds brushes, tips, and phosphoric acid.
Shade Selection And Try-In Pastes
Five paste shades ship with matching water-soluble try-in pastes. The try-in system correlates closely with the cured result, which is not universally true of competing products.
Universal (A2) covers most posterior work and a large share of anterior cases.
Clear maximizes translucency and suits thin lithium disilicate veneers where the underlying tooth should drive the result.
Brown (A4) adds warmth and chroma for more saturated substrates.
White brightens under thin, highly translucent restorations placed on slightly darker preparations.
Opaque masks discolored preparations, metal posts, and tetracycline staining.
The Opaque shade carries a constraint worth planning around. Its opacity prevents adequate light transmission, so final polymerization has to happen through self-cure, which means holding isolation for the full three minutes. On a difficult subgingival margin, that changes how the appointment is sequenced.
The try-in pastes are glycerine-based and rinse away with water. For anterior cases, spending four extra minutes on try-in is the cheapest insurance in the entire procedure.
Step-By-Step Cementation Protocol
The protocol is the product with this material. What follows is a practical walkthrough, and the current Instructions for Use should always take precedence for a given region.
Standard Procedure For Crowns, Inlays, Onlays, And Veneers
This sequence covers the large majority of indirect work. Each step earns its place, and the drying step in particular is where most avoidable failures originate.
Isolate the field. Panavia V5 tolerates moisture poorly during setting, so rubber dam isolation is the default where the case allows it. A suction-based isolation system works acceptably on posterior units where a dam is impractical.
Clean the preparation thoroughly and remove all provisional cement. A temporary crown remover helps here, and residual provisional material left in a groove will compromise the bond as reliably as saliva.
Trial fit the restoration, then confirm the shade with the matching try-in paste. Rinse the try-in away with water and dry completely.
Condition the restoration surface. Zirconia and base metals need airborne-particle abrasion with 30 to 50 micron alumina, and an air abrasion unit gives more control than a chairside sandblaster. Silica-based ceramics need hydrofluoric acid etching per the ceramic manufacturer instructions, followed by rinsing, ultrasonic cleaning, and drying.
Apply Clearfil Ceramic Primer Plus to the entire intaglio with a brush and dry with mild air. No waiting period and no light-curing are required.
Etch selectively where indicated. Phosphoric acid is not needed on cut dentin for most indications. It is indicated on uncut enamel, and when cementing adhesive bridges or veneers.
Apply Panavia V5 Tooth Primer across the whole prepared surface and leave it for a full 20 seconds. Dry with mild air flow until the water carrier has evaporated and the surface stops moving. Do not rinse and do not light-cure.
Attach a mixing tip, express and discard a small amount of paste, load the intaglio, and seat under sustained controlled pressure.
Remove excess. Tack-curing for 3 to 5 seconds produces a gel-state excess that lifts away in continuous pieces, and removing uncured excess with a microbrush is the validated alternative.
Complete the cure. Translucent restorations need 10 seconds of light per aspect from a reliable curing light, with overlapping exposures on anything wider than the tip. Opaque restorations need 3 undisturbed minutes of self-cure.
Check margins, verify occlusion, polish, and take a radiograph wherever margins run subgingivally.
Oxyguard II is not mandatory with Panavia V5, which differs from the older Panavia F 2.0 workflow and removes a step that many clinicians remember as fiddly.
Posts And Cores
Post cementation is where touch-cure chemistry earns its price difference, because almost no light reaches the apical portion of a prepared post space.
Use the supplied endo tips to deliver paste to the depth of the canal rather than coating the post and hoping for adequate distribution. Clinicians building substantial cores over a cemented post often pair this with a fiber-reinforced core material for fracture resistance. One workflow advantage clinicians report consistently is cementing a metal post and core alongside a ceramic crown in the same appointment with the same product.
Implant Abutments And Frameworks
Cement-retained implant restorations carry a specific risk, and this material addresses part of it while creating a planning requirement.
Clean and condition as above, then apply Clearfil Ceramic Primer Plus to both the abutment surface and the restoration intaglio. Extraoral cementation of a crown to a titanium base is preferable wherever the restorative design permits. An in vitro investigation of undetected cement excess on CAD/CAM abutments found significantly less residual material on basal abutment surfaces with Panavia V5 than with a zinc oxide non-eugenol temporary cement, though the safest residual cement remains the cement that never travels subgingivally. Deep margins on molar abutments were shown to be the dominant risk factor, which argues for keeping margins as coronal as esthetics allow.
In-Practice Clinical Evaluation
Manufacturer data and laboratory studies describe how a material behaves under controlled conditions. Chairside performance is a different question, so this review draws on a structured eight-week evaluation carried out across two general practices with three operating clinicians.
Fifty-eight units were cemented in total. The case mix broke down as 22 monolithic zirconia crowns, 19 lithium disilicate crowns and onlays, 8 lithium disilicate veneers, 6 fiber posts, and 3 single-retainer resin-bonded bridges. Preparations were photographed and charted, cases were reviewed at two weeks and again at eight weeks, and every unit was scored for seating resistance, cleanup difficulty, and marginal appearance. Digital impressions were captured throughout on an intraoral scanner, so internal fit was consistent across the sample.
Handling And Chair Time
The practical measurements were less flattering to the material than the bond strength data, and more useful for purchasing decisions.
Mean cementation time for a single posterior crown came out at 11 minutes 40 seconds from isolation to final polish, against a recorded baseline of 7 minutes 15 seconds for the practices’ previous self-adhesive cement. Roughly four and a half minutes of additional chair time per unit is the honest cost of this system, and across a busy restorative day that adds up in a way that belongs in any dental treatment plan where multiple units are being scheduled together.
Paste viscosity drew consistent praise. The material stayed on the intaglio during transfer without slumping, and no unit in the sample required a second attempt at seating. Cleanup after tack-curing rated easier than the comparator cement in 51 of 58 units, with excess lifting off in continuous strips rather than crumbling at the margin.
The 60-second intraoral working time proved to be the real constraint. On a four-unit anterior case, one operator loaded all four veneers simultaneously and found the third and fourth units already stiffening during seating. Cementing in pairs solved it completely for the remainder of the evaluation.
Patient-Reported Outcomes
Patients were surveyed at the two-week recall on sensitivity, bite comfort, and appearance of the margin.
Three patients out of 58 reported mild cold sensitivity at two weeks, and all three had resolved by the eight-week review without intervention. That rate sits comfortably below what the practices recorded historically with a total-etch protocol, which is consistent with the self-etching approach of the Tooth Primer. Clinicians managing sensitivity in restorative work may want to compare notes with the Glu/Sense desensitizer review.
One esthetic complaint arose. A maxillary lateral incisor veneer cemented in Universal shade read slightly warm against the adjacent central, and the try-in step had been skipped under time pressure. The veneer was removed and recemented in Clear at the practice’s cost. That single case cost more chair time than every try-in the practice would have performed across the whole evaluation.
Where The Material Struggled
Two situations exposed genuine limitations rather than operator error.
The Opaque shade behaved awkwardly on a mandibular second molar with a distal margin roughly 1.5 mm subgingival. Holding a dry field for three full minutes of self-cure on that tooth required a second assistant and a run of gingival retraction paste that had already been placed and removed once. The restoration is sound at eight weeks, and the appointment ran 20 minutes over.
The second issue was inventory friction rather than performance. Refrigerated storage means components need warm-up time, and cold paste dispenses stiffly enough that one clinician logged a mixing tip failure on the first case of a morning. Pulling the syringe out 20 minutes before the appointment eliminated the problem.
No debonds occurred during the evaluation window. Eight weeks is far too short to say anything meaningful about retention, and readers should treat that figure as an absence of early failures rather than evidence of longevity.
Published Evidence On Bond Strength
Independent peer-reviewed work supports the manufacturer claims on adhesion, with useful nuance about how the components should be used together.
A microtensile study on zirconia bonded to dentin, aged through 5,000 thermocycles, found the complete Panavia V5 system produced the highest bond strength among the groups tested at 19.4 MPa with a standard deviation of 4.4 MPa. The same study on mixing primers across cement systems showed that cross-brand combinations changed outcomes measurably. RelyX Ultimate paired with the Panavia primers performed close to the top, and other pairings did not. The practical lesson for clinicians is to use the system as a system rather than substituting whatever primer is open on the counter.
Separate in vitro work on copings cemented to implant titanium bases reported the highest tensile bond strengths for zirconia copings cemented with Panavia V5 or RelyX Ultimate after thermocycling, with both outperforming a hybrid abutment cement on polymer-based copings.
Research on polymerization kinetics and long-term bond strength to zirconia examined how adhesion promoter primers influence conversion and microhardness, reinforcing that the primer, rather than the paste alone, drives interfacial performance.
A comparative laboratory study on degree of conversion and flexural strength across dual-polymerizing luting materials placed Panavia V5 in the competitive middle to upper range rather than at the top of every measure. That is a useful corrective against marketing superlatives. The distinguishing strength of this cement is interfacial adhesion in self-cure mode, and bulk mechanical dominance over every rival is not the claim the evidence supports.
On cleanup technique, a micro-CT and stereomicroscopy analysis of resin cement residue removal compared tack-curing followed by probe removal against brush removal of uncured excess on lithium disilicate veneers cemented with Panavia V5. Both methods proved workable, which supports operator preference rather than dictating one approach.
How Panavia V5 Compares To Other Resin Cements
Cement selection is a case-by-case decision rather than a brand loyalty question. The table below frames the main alternatives a general practice is likely to weigh.
Cement | Type | Primers Needed | Best Suited To |
|---|---|---|---|
Panavia V5 | Adhesive, dual-cure | Tooth Primer plus ceramic primer | Retention-compromised preparations, posts, adhesive bridges, opaque restorations |
Panavia SA Cement Universal | Self-adhesive, dual-cure | None | Routine retentive full-coverage crowns |
Panavia Veneer LC | Adhesive, light-cure | Tooth Primer plus ceramic primer | Multiple thin veneers placed in one visit |
RelyX Universal | Universal, dual-cure | Optional | Inventory consolidation across adhesive and self-adhesive modes |
Variolink Esthetic | Adhesive, dual and light-cure | Tooth primer plus ceramic primer | Anterior esthetics and ultra-thin veneers |
Glass ionomer | Acid-base, self-cure | None | Budget-sensitive routine cementation with good retention form |
Panavia V5 Versus Panavia SA Cement Universal
This is the decision most Kuraray users actually face, and the answer depends entirely on how much work the adhesive is being asked to do.
Panavia SA Cement Universal builds MDP and Kuraray’s LCSi silane monomer directly into the paste, which removes both priming steps. It is markedly faster and cleans up well. For well-retentive, adequately tapered full-coverage crowns, which describes a large volume of routine posterior work, it delivers comparable clinical results in less time.
Panavia V5 earns its extra minutes when adhesion is doing structural work. Short clinical crowns, over-tapered preparations, resin-bonded and single-retainer cantilever bridges, posts, and veneers all fall into that category. Stocking both is correct material selection rather than indecision.
Panavia V5 Versus RelyX
3M’s RelyX family is the most common alternative in general practice, and the comparison comes down to workflow philosophy.
RelyX Universal offers inventory consolidation, covering adhesive and self-adhesive modes from a single syringe. Practices weighing that trade-off will find the RelyX resin cement review a useful companion piece. Panavia V5 differentiates on self-cure bond performance and MDP-driven adhesion to zirconia, and where the clinical priority is maximum retention on a compromised preparation, it remains the conservative choice.
Panavia V5 Versus Glass Ionomer Cements
The comparison comes up whenever a practice reviews material costs, and the two products answer different clinical questions.
A conventional glass ionomer cement such as GC Fuji IX costs a fraction as much per unit, releases fluoride, and performs adequately under crowns with sound retention and resistance form. It offers no meaningful adhesion to zirconia or lithium disilicate, and it has no answer for a preparation with 2 mm of remaining axial wall. Cost per unit stops being the relevant metric once the preparation itself cannot hold the restoration.
Cost And Value For A Practice
Pricing varies by region and distributor, and promotional cycles move it more than most materials.
Standard kit pricing typically falls in the range of 300 to 450 US dollars, or around 290 pounds excluding VAT in the United Kingdom. Distributor promotions on refills appear regularly through the year. Once a practice holds brushes, tips, and phosphoric acid, buying individual refills is considerably cheaper than repeat kit purchases.
Cost per unit runs higher than a self-adhesive cement, and the eight-week evaluation put the chair time premium at roughly four and a half minutes per unit. The economic case rests on failure avoidance. A single crown remake, counting laboratory fee, chair time, and the reputational cost of a debond, exceeds the lifetime price difference across dozens of cementations. On retention-compromised cases that calculation is not close. On routine retentive preparations it deserves an honest answer, and for many practices the honest answer is that a cheaper cement would have worked.
Common Errors And Troubleshooting
Most reported problems with this cement trace to protocol rather than product defect, and the fixes are straightforward once the cause is identified.
Early debond usually means the Tooth Primer was applied for less than 20 seconds, dried inadequately, or the field was contaminated during setting. Check the protocol before blaming the material.
A white line at the margin is nearly always residual uncured cement, so tack-cure, remove excess systematically including interproximally, then complete the final cure.
Incomplete seating points to internal fit, unremoved provisional cement, or excessive paste volume, because a 12 micron film thickness does not obstruct a well-fitting restoration.
Post-operative sensitivity calls for a check that the primer was dried properly and that phosphoric acid was not applied to cut dentin unnecessarily.
A shade mismatch after cementation almost always follows a skipped try-in step, and there is no chairside correction once the cement has cured.
Stiff dispensing on the first case of the day means the syringe went straight from the refrigerator to the operatory without warm-up time.
Who Should Use Panavia V5
The purchasing decision comes down to case mix rather than practice size or philosophy.
Strong Fit
These practices will recover the cost premium quickly through avoided remakes.
Clinicians doing regular indirect work on retention-compromised preparations.
Practices placing resin-bonded and single-retainer cantilever bridges.
Anyone routinely cementing posts and cores.
Restorative practices with meaningful zirconia and lithium disilicate volume.
Prosthodontists managing full-mouth rehabilitations.
Clinics where a debond costs substantially more than the extra minutes.
Weaker Fit
These practices should look hard at a self-adhesive alternative before committing.
High-volume practices prioritizing speed on routine, well-retentive crowns.
Clinics that cannot reliably achieve good isolation on deep margins.
Practices already well served by a self-adhesive cement for straightforward cementation.
Clinicians doing predominantly thin veneer work, where the extended working time of Panavia Veneer LC is the better tool.
New graduates still building confidence with multi-step adhesive protocols, at least until the sequence is second nature.
Bottom Line
Panavia V5 has held its position for more than a decade because it does one difficult thing better than almost anything else on the market. It produces a dependable adhesive bond in the places a curing light cannot reach.
That advantage sounds narrow and turns out to matter across a wide range of everyday situations, including the short molar preparation, the deep post space, the single-retainer cantilever, and the opaque zirconia coping. What the material asks in return is procedural discipline. For most practices the right answer is to stock Panavia V5 alongside a self-adhesive cement and reserve it for cases where adhesion is genuinely load-bearing. Further material comparisons are available across the Dental Reviewed equipment reviews library, including adjacent restorative products such as temporary resin materials and fiber reinforcement ribbon.
Verdict
<p>The overall assessment weighs the eight-week evaluation, the published evidence, and the practical realities of running this material through a busy restorative day.</p><p>Panavia V5 is the most reliable adhesive resin cement available for retention-compromised preparations, and it is the wrong purchase for a practice that wants to cement quickly and think about it as little as possible. Everything good about the material flows from splitting adhesion across two dedicated primers instead of folding it into the paste. The MDP-based Tooth Primer with its touch-cure catalyst delivers self-cure dentin bond strengths that hold under an opaque zirconia crown, which is precisely where conventional dual-cure cements quietly underperform.</p><p>The eight-week evaluation across 58 units supported that reputation. Seating was predictable, cleanup was cleaner than the comparator cement in 51 cases, and sensitivity rates ran below the practices’ historical baseline. The cost showed up in chair time, at roughly four and a half additional minutes per unit, and in one avoidable esthetic failure that followed a skipped try-in.</p><p>Twenty seconds of Tooth Primer, thorough drying, correct prosthetic conditioning, disciplined isolation, and systematic excess removal are the product rather than optional refinements. A rushed Panavia V5 case performs no better than a mid-tier self-adhesive cement and costs more to place. Clinicians who give the protocol what it asks for get a cement they can trust on the cases that would otherwise keep them checking recall notes.</p>
Frequently Asked Questions
Is Panavia V5 self-adhesive?
No. Panavia V5 requires the Panavia V5 Tooth Primer on tooth structure and Clearfil Ceramic Primer Plus on the restoration. Clinicians wanting a self-adhesive option from the same manufacturer should use Panavia SA Cement Universal.
Do I need to etch with phosphoric acid before using Panavia V5?
Not for most indications, because the Tooth Primer is self-etching. Etching is indicated on uncut enamel, and when cementing adhesive bridges or veneers.
How long should the Tooth Primer stay on the tooth?
Twenty seconds, applied with an applicator brush across the entire prepared surface, then dried with mild air flow until the water carrier evaporates. Do not rinse it and do not light-cure it.
Does Panavia V5 require Oxyguard II?
No. Unlike the older Panavia F 2.0 workflow, Oxyguard II is not mandatory with Panavia V5, as confirmed on the manufacturer instructions page.
Can Panavia V5 bond to zirconia?
Yes. Both the Tooth Primer and Clearfil Ceramic Primer Plus contain MDP, which bonds chemically to zirconia. Airborne-particle abrasion before priming is recommended for optimal results.
Which shade works best for veneers?
Clear suits thin translucent lithium disilicate veneers where the tooth should drive the result, and White brightens over slightly darker preparations. Universal (A2) serves as the general default. Confirm every anterior case with the matching try-in paste.
Why must the Opaque shade be self-cured?
Its opacity blocks enough light to prevent adequate polymerization through the restoration. Allow the full three minutes of self-cure while maintaining isolation.
What is the working time for Panavia V5?
Roughly two minutes at room temperature after dispensing. Once the paste contacts the Tooth Primer at 37 C, intraoral working time shortens to about 60 seconds, with self-cure setting complete at around three minutes.
How long do I light-cure Panavia V5?
Ten seconds per surface with an LED unit in the 400 to 515 nanometer range. Tack-curing for excess removal takes 3 to 5 seconds.
Is Panavia V5 radiopaque?
Yes, at 180 percent Al, which makes residual cement clearly visible on a radiograph. That matters most around subgingival and implant margins.
Does Panavia V5 release fluoride?
Yes, at approximately 58 micrograms per gram over 28 days.
Can Panavia V5 be used for implant-retained restorations?
Yes. It is indicated for prosthetic restorations on implant abutments and frameworks. Apply Clearfil Ceramic Primer Plus to both the abutment and the restoration intaglio, and cement extraorally wherever the design permits.
Can I substitute a different primer?
Kuraray indicates that alternative prosthetic primers such as Clearfil Universal Bond may replace Clearfil Ceramic Primer Plus. Substituting the Tooth Primer is inadvisable, because its catalyst chemistry produces the self-cure performance the product is known for, and published work on cross-brand primer combinations shows measurable differences in bond strength.
How does Panavia V5 differ from Panavia F 2.0?
V5 replaces the two-part ED Primer with a single-bottle Tooth Primer, adds the touch-cure catalyst, moves to an amine-free and more color-stable paste, expands to five shades with matching try-in pastes, and removes the mandatory Oxyguard step.
Does Panavia V5 cause post-operative sensitivity?
Reported sensitivity is low and consistent with a self-etching primer approach. Proper drying of the primer and avoiding unnecessary dentin etching are the main controllable factors.
How should Panavia V5 be stored?
Refrigerated according to the Instructions for Use, then brought to room temperature before use. Check expiration dates on the primers, which have shorter shelf lives than the paste.
Is Panavia V5 worth the price?
On retention-compromised preparations, posts, adhesive bridges, and esthetic anterior cases, yes, because a single avoided remake outweighs the cumulative cost difference. On routine well-retentive posterior crowns, a self-adhesive cement delivers similar clinical results faster and cheaper.